
OneLogin
OneLogin confiuration to allow authenticating user from AppScho
Introduction
AppScho is able to use a OneLogin instance in order to authenticate the users from your institution. This interconnexion use OneLogin's support for the OpenID Connect standard in order to authenticate an authorize user signins.
This document assumes a light prior knowledge of OpenID Connect and how it works.
Configuration
Creating an OpenID Connect application
In your OneLogin management console, go to Apps > Add apps and search for "openid", your should see the Openid Connect (OIDC) application template published by OneLogin, Inc.. Please select this option.
On the first screen, you can configure the application display attribute, by providing a name (for example, the name of your mobile app) as well as logos and a description. Please fill in the form to match your brand identity, and click Save.

Configure the Redirect URI
In the Configuration tab, fill in the URL that AppScho provided you (it should look like https://xxx.callback.oauth.appscho.com) in the box for Redirect URI's.

Configuration of the parameters
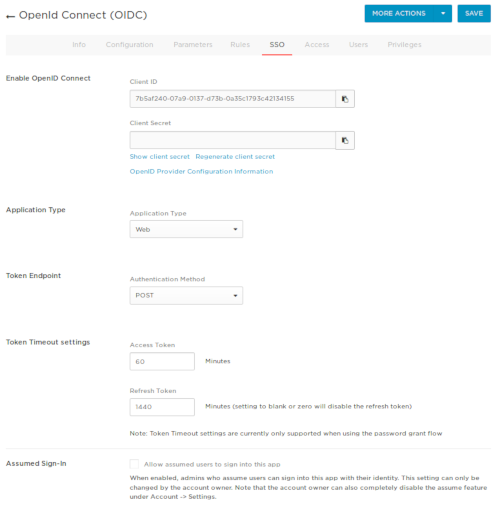
In the SSO tab, please fill in the following information:
Application type : Web AppScho is a native app, but still uses a Web flow for OpenID Connect authentication
Token endpoint : POST This configures the carrier method used to include service credentials
Token timeouts :
Access token : 60 This can be modified as you like, but we recommend not to go below one hour.
Refresh token : 1440 This can be modified as your like, but we recommend not to go below one day.
Please copy the value for the Client ID and Client Secret at the top of the page, and send it to AppScho. These ID are used to identify the request coming from us.
Additional configurations
Just like your other authentication processes on OneLogin, you can add rules that control what data is released when a user is authenticated through the application you just created.
You may need to configure some additional attribute to return to AppScho to be used within the app. Those attributes will be availble in the is_token as well as through the /userinfo endpoint.
For instance, if you can and want to add the user's profile picture, click on Add parameter, and indicate the name of the attribute under which the picture will be published in Field name, here, picture. Then, in the Value field, select the OneLogin attribute you wish to use for the claim, here Profile picture.

Save the form for the attribute to be returned to us after authentication.
Last updated
Was this helpful?